Windows
Once the folder size is known, inspect how DSC is configured and whether it should be removing old status records.
Check the types of files stored in the status folder:
Get-ChildItem "C:\Windows\System32\Configuration\ConfigurationStatus" |
    Group-Object Extension |
    Sort-Object Count -Descending |
    Select-Object Count, Name
This provides insight into what DSC is generating and whether unexpected file types are present.
Review the Local Configuration Manager (LCM) configuration:
Get-DscLocalConfigurationManager | Select-Object *Pay particular attention to:
| Setting | Purpose |
|---|---|
| ConfigurationMode | Defines how DSC applies configurations |
| RefreshMode | Determines how configurations are received |
| StatusRetentionTimeInDays | Controls how long status history is kept |
| RefreshFrequencyMins | Defines how often DSC checks for updates |
Finally, inspect the recorded DSC execution history:
Get-DscConfigurationStatus -AllIf DSC reports deserialization errors, the status history or DSC state information may be corrupted and additional repair steps will be required.
The ConfigurationStatus folder contains historical DSC execution information. When retention stops working correctly, the folder can grow to many gigabytes and contain thousands of old files.
Before deleting anything, stop the WinRM service and create a backup location:
Stop-Service WinRM

New-Item D:\DSCBackup -ItemType Directory
A practical approach is to remove status files older than 30 days:
Get-ChildItem "C:\Windows\System32\Configuration\ConfigurationStatus" |
    Where-Object LastWriteTime -lt (Get-Date).AddDays(-30) |
    Remove-Item -Force
This removes only historical status information and leaves recent records intact.
After the cleanup, verify whether DSC can read the remaining status information:
Get-DscConfigurationStatus | Select-Object StartDate,Type,StatusIf DSC status retrieval works again, the problem was likely caused by old or corrupted status files.
If the same deserialization error continues to appear even after removing the historical data, the issue is likely deeper than the status history itself and may involve corrupted DSC state information or a failing DSC configuration.
Cleaning the folder reduces disk usage, but additional troubleshooting may still be necessary to restore full DSC functionality.
A large ConfigurationStatus folder is often the first sign that DSC status retention is no longer working correctly. Before making any changes, determine how much space is being consumed and whether old status files are accumulating.
First identify the operating system version:
Get-ComputerInfo | Select-Object WindowsProductName, WindowsVersion, OsBuildNumberThis helps determine whether known DSC issues may apply to the server version.
Count the number of status files:
(Get-ChildItem "C:\Windows\System32\Configuration\ConfigurationStatus").CountA very high number may indicate that status files are no longer being cleaned up automatically.
Calculate the total size:
Get-ChildItem "C:\Windows\System32\Configuration\ConfigurationStatus" -File |
    Measure-Object Length -Sum
Review the oldest files:
Get-ChildItem "C:\Windows\System32\Configuration\ConfigurationStatus" |
    Sort-Object LastWriteTime |
    Select-Object -First 10
Review the newest files:
Get-ChildItem "C:\Windows\System32\Configuration\ConfigurationStatus" |
    Sort-Object LastWriteTime -Descending |
    Select-Object -First 10
Comparing old and new files helps determine whether retention is working and whether DSC is still actively generating status data.
Have you ever wondered where all your disk space has gone? Instead of manually browsing folders, Windows includes a powerful command that quickly identifies the largest space consumers on your drive.
The Command
diskusage C:\ /h /t=10What It Does
This command scans the C: drive and displays the 10 largest folders or files, helping you quickly locate areas that consume the most storage.
| Option | Description |
|---|---|
C:\ |
Starts the scan at the root of the C: drive |
/h |
Shows sizes in a human-readable format (MB, GB, TB) |
/t=10 |
Limits the output to the top 10 largest results |
Why It Is Useful
- Quickly identify storage problems
- Find large folders without third-party tools
- Useful for Windows cleanup and troubleshooting
- Easy to run from Command Prompt or PowerShell
Example Output
45.2 GB  C:\Windows
32.8 GB  C:\Users
18.4 GB  C:\Program Files
12.1 GB  C:\ProgramData
In this example, the largest space consumers are displayed first, making it easy to focus cleanup efforts where they will have the biggest impact.
Additional Helpful Variations
Show all results:
diskusage C:\ /hAnalyze a specific folder:
diskusage C:\Windows /h /t=20Limit the folder depth:
diskusage C:\ /h /u=3If a Windows machine is running low on disk space, this command is often one of the fastest ways to discover where the storage is being used.
For advanced users, the Windows Registry can be modified to disable biometric features:
-
Press
Windows + R, typeregedit, and press Enter to open the Registry Editor. -
Navigate to:
HKEY_LOCAL_MACHINE\SOFTWARE\Policies\Microsoft\Biometrics. -
If the Biometrics key doesn't exist, create it:
-
Right-click on Microsoft, select New > Key, and name it Biometrics.
-
-
Within the Biometrics key, create a new DWORD (32-bit) value named Enabled.
-
Set the value of Enabled to
0.
Setting this value to 0 disables all biometric features, including facial recognition. To re-enable, change the value back to1.
If the built-in Stereo Mix method is unavailable or insufficient:
- VoiceMeeter: A third-party application that provides advanced audio routing capabilities, allowing for complex configurations of multiple audio outputs.
- Audio Splitters: Physical devices that can duplicate audio signals to multiple outputs without software configuration.
These alternatives offer additional flexibility for managing multiple audio outputs.
Windows 11 supports the use of both Bluetooth and wired audio devices at the same time:
- Follow the steps to enable Stereo Mix and set it as the default recording device.
- Configure the Listen settings for your wired device to route audio through Stereo Mix.
- Ensure your Bluetooth device is connected and set as one of the playback devices.
This setup allows audio to be played through both Bluetooth and wired devices concurrently.
If you encounter issues with dual audio output:
- Update Drivers: Ensure all audio drivers are current to prevent compatibility problems.
- Check Connections: Verify that all audio devices are properly connected and recognized by the system.
- Test Sound: Conduct sound tests to confirm audio is playing through both outputs.
- Adjust Volume: Manage volume levels for each device to achieve balanced sound.
- Restart System: Reboot your computer if changes do not take effect immediately.
These steps can help resolve common issues related to multiple audio outputs.
After enabling Stereo Mix, configure your playback devices:
- In the Playback tab of the Sound Control Panel, right-click your primary audio device and select Properties.
- Navigate to the Listen tab.
- Check the box labeled Listen to this device.
- From the dropdown menu, select Stereo Mix as the playback device.
- Click Apply to confirm the changes.
This configuration routes audio through both selected devices simultaneously.
To play audio through two devices at once, enable the "Stereo Mix" feature:
- Right-click the speaker icon in the taskbar and select Open Sound settings.
- Scroll down and click on More sound settings under the Advanced section.
- In the Recording tab, right-click and select Show Disabled Devices.
- Right-click on Stereo Mix and choose Enable.
- Set Stereo Mix as the default recording device by right-clicking it and selecting Set as Default Device.
This setup allows audio to be duplicated across multiple output devices.
Windows 11 allows users to output audio to multiple devices simultaneously, such as speakers and headphones. This capability is useful for various scenarios, including sharing audio with others or managing different audio streams for multitasking. The following Snipps provide step-by-step instructions to set up and manage multiple audio outputs effectively.
To disable all biometric devices, including facial recognition hardware, follow these steps:
-
Right-click the Start button and select Device Manager.
-
Expand the Biometric Devices section.
-
Right-click on your biometric device (e.g., IR camera) and choose Disable device.
-
Confirm the action when prompted.
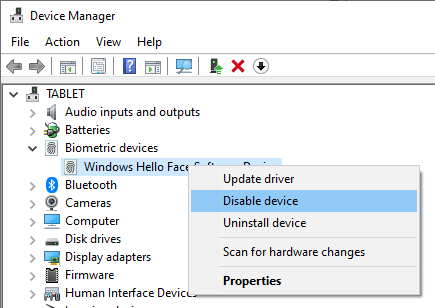
Disabling the biometric device prevents the system from using any biometric authentication methods.
The most straightforward method to disable facial recognition is through the Windows Settings:
-
Press
Windows + Ito open Settings. -
Navigate to Accounts > Sign-in options.
-
Under Facial Recognition (Windows Hello), click Remove.
-
Confirm your choice by entering your PIN or password if prompted.
This action removes the facial recognition data associated with your account, disabling the feature for subsequent sign-ins.
Facial recognition, offered through Windows Hello, is convenient for signing in to your Windows device. However, there are scenarios where disabling this feature is preferable, such as privacy concerns, device sharing, or technical issues. This guide outlines three methods to disable facial recognition on Windows 10 and 11.
To manage certificates in Windows, you can use two key tools:
- certmgr.msc: This tool helps manage certificates for individual users on the computer. It allows you to view, import, export, and manage various certificate-related tasks for your user account.
- certlm.msc: This tool is used to manage certificates at the computer level rather than individual user accounts. It enables you to handle certificates for system-wide applications and services, including viewing, importing, and exporting certificates relevant to the entire computer.
"DefaultUser1" in Windows is a system-generated user profile created during system updates or installations. It typically appears when Windows encounters issues creating or updating a user profile. This profile is used internally by the system and is not meant for regular user interaction. More information about DefaultUser1 and how it interacts with your account can be found in this support article: Who Is It "DefaultUser1" in Windows.
- .NET
- Agile
- AI
- ASP.NET Core
- Azure
- C#
- Cloud Computing
- CSS
- EF Core
- HTML
- JavaScript
- Microsoft Entra
- PowerShell
- Quotes
- React
- Security
- Software Development
- SQL
- Technology
- Testing
- Visual Studio
- Windows