Azure
A good logging configuration helps you troubleshoot problems quickly while avoiding unnecessary telemetry and storage costs. In ASP.NET Core, Application Insights is configured in two parts: one for connecting to Azure and another for controlling which log messages are collected.
Configure the Application Insights Connection
The ApplicationInsights section contains the connection to your Azure Application Insights resource.
{
  "ApplicationInsights": {
    "ConnectionString": "InstrumentationKey=...;IngestionEndpoint=..."
  }
}
Using a Connection String is the recommended approach and replaces the older Instrumentation Key.
Configure Logging
The Logging section determines which messages are written by your application. In most cases, the global LogLevel settings are sufficient. If needed, you can also define provider-specific settings for Application Insights.
{
  "ApplicationInsights": {
    "ConnectionString": "InstrumentationKey=...;IngestionEndpoint=..."
  },
  "Logging": {
    "LogLevel": {
      "Default": "Information",
      "YourCompany.YourApplication": "Information",
      "Microsoft": "Warning",
      "System": "Warning",
      "Microsoft.Hosting.Lifetime": "Information"
    },
    "ApplicationInsights": {
      "LogLevel": {
        "Default": "Information",
        "YourCompany.YourApplication": "Information",
        "Microsoft": "Warning",
        "System": "Warning"
      }
    }
  }
}
What Each Setting Does
| Setting | Purpose |
|---|---|
ApplicationInsights:ConnectionString |
Connects the application to your Azure Application Insights resource. |
Logging:LogLevel |
Defines the default log levels used throughout the application. |
Logging:ApplicationInsights:LogLevel |
Optionally overrides the log levels used only by the Application Insights logging provider. |
Recommended Production Configuration
A balanced production configuration is usually:
- Default:
Information - Your application namespace:
Information - Microsoft:
Warning - System:
Warning - Microsoft.Hosting.Lifetime:
Information
For development, you can temporarily change your own application's namespace to Debug or Trace to collect more detailed diagnostic information without increasing the verbosity of framework logs.
This configuration provides useful application telemetry, keeps framework logging under control, and makes troubleshooting easier while avoiding unnecessary noise and storage costs.
When an IP address no longer requires access, delete its firewall rule to maintain a secure environment.
Delete a server-level rule:
EXECUTE sp_delete_firewall_rule @name = 'AllowOfficeIP';Delete a database-level rule:
EXECUTE sp_delete_database_firewall_rule @name = 'AllowDevMachine';If you encounter issues deleting rules (for instance, due to missing permissions), ensure you’re connected with sufficient administrative rights or use the Azure Portal for manual removal.
To check which IP addresses have access to your Azure SQL Database, use the following T-SQL queries:
To list server-level firewall rules:
SELECT * FROM sys.firewall_rules;To list database-level firewall rules:
SELECT * FROM sys.database_firewall_rules;This helps verify which IP ranges currently have access and ensures that no outdated or overly broad rules are active. Regular audits of firewall rules are essential for maintaining data security.
Source: Todd Kitta GitHub – Configure Firewall Settings T-SQL
You can create firewall rules in Azure SQL using T-SQL commands or directly in the Azure Portal.
Using T-SQL (Server-level example):
EXECUTE sp_set_firewall_rule
    @name = 'AllowOfficeIP',
    @start_ip_address = '203.0.113.0',
    @end_ip_address = '203.0.113.0';
For a database-level rule:
EXECUTE sp_set_database_firewall_rule
    @name = 'AllowDevMachine',
    @start_ip_address = '198.51.100.10',
    @end_ip_address = '198.51.100.10';
Tip: Always double-check the IP range and limit access to only the addresses that genuinely need it to avoid overly broad access.
Source: SQLShack – Configure IP Firewall Rules for Azure SQL Databases
Azure SQL uses a layered firewall model:
- Server-level firewall rules: These define allowed IP address ranges for the entire logical SQL server. Any database under that server inherits these settings.
- Database-level firewall rules: These are stored within an individual database and apply only to connections to that database.
When to use each:
- Use server-level rules when multiple databases need the same IP access.
- Use database-level rules when access needs to be restricted to specific databases or when users lack server-level permissions.
Example:
- Allowing your organization’s office IP to access all databases? → Use server-level.
- Granting temporary access to a consultant for one database? → Use database-level.
Reference: Rishan Digital – Firewall Rules and Authentication
Firewall rules in Azure SQL Database control which IP addresses can connect to your database server. Configuring these rules correctly ensures that only trusted users and applications access your data while keeping it secure from unauthorized traffic.
Azure provides two levels of firewall configuration: server-level and database-level rules. Server-level rules allow access to all databases under a logical server, while database-level rules apply only to a specific database.
You can configure firewall rules using the Azure Portal, Transact-SQL (T-SQL) commands, or PowerShell. Understanding how and where to apply these rules helps ensure a secure and flexible environment for managing database access.
When you use EventId in .NET logs, both the Id (an integer) and Name are sent to Application Insights as part of customDimensions. However, the EventId.Id is stored as a string, which affects how you can filter it.
Limitation in UI Filters
The Application Insights UI filter panel only supports string operations like equals or contains. You can’t use greater than or less than filters directly in the UI.
Use KQL for Numeric Filtering
To filter numerically, use the Logs (Analytics) tab with Kusto Query Language (KQL):
This converts the string to an integer so you can filter properly.
Pro Tip
Use numeric ranges for EventId to categorize logs (e.g., 1000–1999 = Auth, 2000–2999 = Payments) and filter easily with KQL.
Tracking custom events with TrackEvent() in Azure Application Insights helps you monitor how users interact with your app. However, to obtain meaningful data, it's essential to name your events clearly and consistently.
Here are some best practices:
Use Clear, Descriptive Names
Write event names using a Verb-Noun format like UserLoggedIn, FileDownloaded, or OrderSubmitted. This makes them easy to understand.
Stick to PascalCase
Use PascalCase (each word starts with a capital letter), and avoid:
- Spaces (
User Logged In) - Dashes (
User-Logged-In) - Underscores (
user_logged_in)
Use: UserLoggedIn
Don’t Include Dynamic Data
Keep user IDs, file names, or other changing values out of the event name.
Instead, put that info in custom properties or metrics.
Keep It Consistent
Follow the same naming style across your app. This makes it easier to search and analyze data later.
Be Specific When Needed
If similar actions happen in different contexts, make your event name more specific:ContactFormSubmitted vs. FeedbackFormSubmitted
Tip
Use a naming template like:<Action><Entity>[<Qualifier>]
Example: AddedItemToCart
A clean, consistent naming strategy makes your telemetry easier to work with, both now and in the future.
Application Insights doesn’t store the original .NET LogLevel (like Debug or Trace) — it only stores SeverityLevel, which combines them. To make your logs easier to filter and analyze, you can add LogLevel as a custom property using a TelemetryInitializer.
Example:
Integration
Register the initializer in your app:
services.AddSingleton<ITelemetryInitializer, LogLevelInitializer>();Now, every trace will include a LogLevel key in customDimensions.
Application Insights uses a fixed enum called SeverityLevel with 5 levels: Verbose, Information, Warning, Error, and Critical.
When logging in .NET using ILogger, the log level (such as Debug, Information, or Error) is internally mapped to Application Insights’ SeverityLevel. However, the mapping isn’t one-to-one — and by default, you can lose detail.
SeverityLevel Mapping Overview
Application Insights uses this enum:
| Application Insights SeverityLevel | Typical .NET LogLevel |
|---|---|
| Verbose (0) | Trace / Debug |
| Information (1) | Information |
| Warning (2) | Warning |
| Error (3) | Error |
| Critical (4) | Critical |
Both Trace and Debug are treated as Verbose, which means they can’t be distinguished once sent to Application Insights.
Tip: Add LogLevel as a Custom Property
To retain the original LogLevel, consider using a TelemetryInitializer to add it manually — so you can later filter logs by both SeverityLevel and original LogLevel.
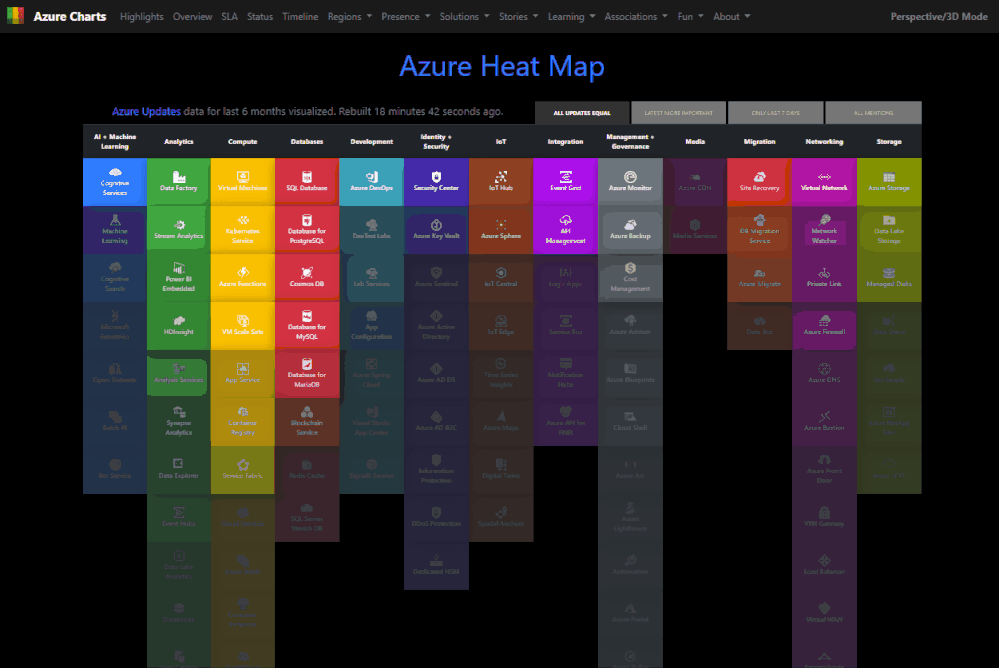
Are you just starting your cloud journey or looking for ways to upgrade your knowledge in specific areas? Azure Charts is a web-based application that allows you to see what Azure consists of and how it evolves.
References
Source app settings from key vault
Complete reference:
@Microsoft.KeyVault(SecretUri=https://myvault.vault.azure.net/secrets/mysecret/)Alternatively:
@Microsoft.KeyVault(VaultName=myvault;SecretName=mysecret)Source: Use Key Vault references - Azure App Service | Microsoft Learn
Microsoft has announced that window sharing of the Microsoft Teams application is now generally available on the Azure Virtual Desktop for Windows users.
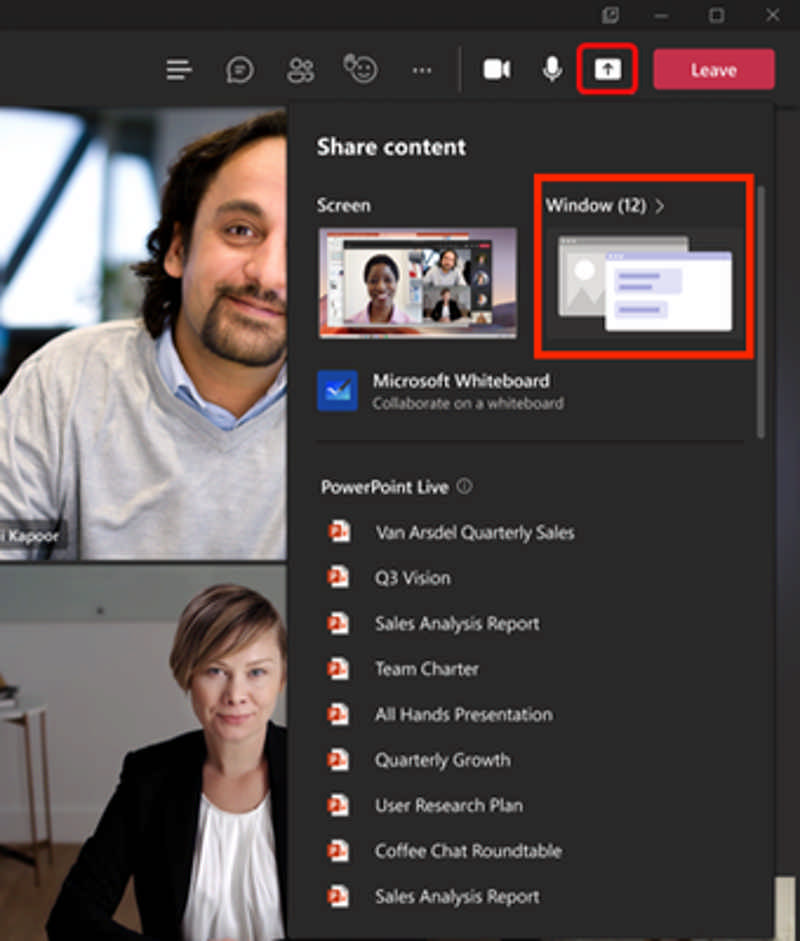
Application window sharing now allows users to select a specific window from their desktop screen to share. Previously, users could only share their entire desktop window or a Microsoft PowerPoint Live presentation. Application window sharing helps reduce the risk of showing sensitive content during meetings/calls and keeps meetings focused by directing participants to specific content.
Read more at Azure Daily 2022
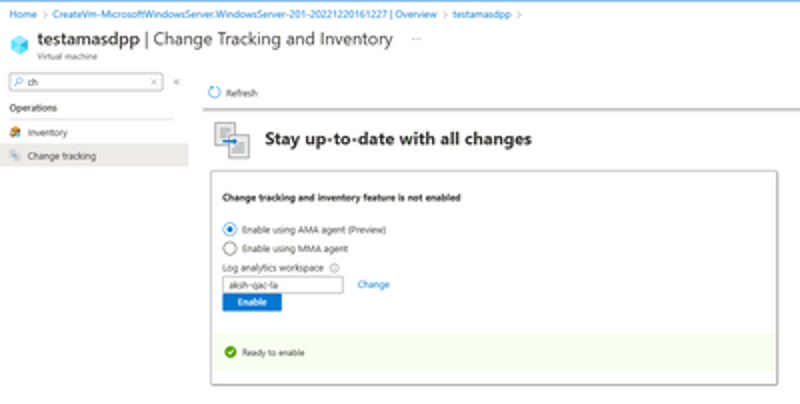
The Change Tracking and Inventory service tracks changes to Files, Registry, Software, Services and Daemons and uses the MMA (Microsoft Monitoring Agent)/OMS (Operations Management Suite) agent. This preview supports the new AMA agent and enhances the following:
- Security/Reliability and Scale - The Azure Monitor Agent enhances security, reliability, and facilitates multi-homing experience to store data.
- Simplified onboarding- You can onboard to Virtual Machines directly to Change Tracking (add link) without needing to configure an Automation account. In new experience, there is
- Rules management – Uses Data Collection Rules to configure or customize various aspects of data collection. For example, you can change the frequency of file collection. DCRs let you configure data collection for specific machines connected to a workspace as compared to the "all or nothing" approach of legacy agents.
Large language models are quickly becoming an essential platform for people to innovate, apply AI to solve big problems, and imagine what’s possible. Today, we are excited to announce the general availability of Azure OpenAI Service as part of Microsoft’s continued commitment to democratizing AI, and ongoing partnership with OpenAI.
With Azure OpenAI Service now generally available, more businesses can apply for access to the most advanced AI models in the world—including GPT-3.5, Codex, and DALL•E 2—backed by the trusted enterprise-grade capabilities and AI-optimized infrastructure of Microsoft Azure, to create cutting-edge applications. Customers will also be able to access ChatGPT—a fine-tuned version of GPT-3.5 that has been trained and runs inference on Azure AI infrastructure—through Azure OpenAI Service soon.
Empowering customers to achieve more

We debuted Azure OpenAI Service in November 2021 to enable customers to tap into the power of large-scale generative AI models with the enterprise promises customers have come to expect from our Azure cloud and computing infrastructure—security, reliability, compliance, data privacy, and built-in Responsible AI capabilities.
Since then, one of the most exciting things we’ve seen is the breadth of use cases Azure OpenAI Service has enabled our customers—from generating content that helps better match shoppers with the right purchases to summarizing customer service tickets, freeing up time for employees to focus on more critical tasks.
Customers of all sizes across industries are using Azure OpenAI Service to do more with less, improve experiences for end-users, and streamline operational efficiencies internally. From startups like Moveworks to multinational corporations like KPMG, organizations small and large are applying the capabilities of Azure OpenAI Service to advanced use cases such as customer support, customization, and gaining insights from data using search, data extraction, and classification.
“At Moveworks, we see Azure OpenAI Service as an important component of our machine learning architecture. It enables us to solve several novel use cases, such as identifying gaps in our customer’s internal knowledge bases and automatically drafting new knowledge articles based on those gaps. This saves IT and HR teams a significant amount of time and improves employee self-service. Azure OpenAI Service will also radically enhance our existing enterprise search capabilities and supercharge our analytics and data visualization offerings. Given that so much of the modern enterprise relies on language to get work done, the possibilities are endless—and we look forward to continued collaboration and partnership with Azure OpenAI Service."—Vaibhav Nivargi, Chief Technology Officer and Founder at Moveworks.
“Al Jazeera Digital is constantly exploring new ways to use technology to support our journalism and better serve our audience. Azure OpenAI Service has the potential to enhance our content production in several ways, including summarization and translation, selection of topics, AI tagging, content extraction, and style guide rule application. We are excited to see this service go to general availability so it can help us further contextualize our reporting by conveying the opinion and the other opinion.”—Jason McCartney, Vice President of Engineering at Al Jazeera.
“KPMG is using Azure OpenAI Service to help companies realize significant efficiencies in their Tax ESG (Environmental, Social, and Governance) initiatives. Companies are moving to make their total tax contributions publicly available. With much of these tax payments buried in IT systems outside of finance, massive data volumes, and incomplete data attributes, Azure OpenAI Service finds the data relationships to predict tax payments and tax type—making it much easier to validate accuracy and categorize payments by country and tax type.”—Brett Weaver, Partner, Tax ESG Leader at KPMG.
Azure—the best place to build AI workloads
The general availability of Azure OpenAI Service is not only an important milestone for our customers but also for Azure.
Azure OpenAI Service provides businesses and developers with high-performance AI models at production scale with industry-leading uptime. This is the same production service that Microsoft uses to power its own products, including GitHub Copilot, an AI pair programmer that helps developers write better code, Power BI, which leverages GPT-3-powered natural language to automatically generate formulae and expressions, and the recently-announced Microsoft Designer, which helps creators build stunning content with natural language prompts.
All of this innovation shares a common thread: Azure’s purpose-built, AI-optimized infrastructure.
Azure is also the core computing power behind OpenAI API’s family of models for research advancement and developer production.
Azure is currently the only global public cloud that offers AI supercomputers with massive scale-up and scale-out capabilities. With a unique architecture design that combines leading GPU and networking solutions, Azure delivers best-in-class performance and scale for the most compute-intensive AI training and inference workloads. It’s the reason the world’s leading AI companies—including OpenAI, Meta, Hugging Face, and others—continue to choose Azure to advance their AI innovation. Azure currently ranks in the top 15 of the TOP500 supercomputers worldwide and is the highest-ranked global cloud services provider today. Azure continues to be the cloud and compute power that propels large-scale AI advancements across the globe.

Source: TOP500 The List: TOP500 November 2022, Green500 November 2022.
A responsible approach to AI
As an industry leader, we recognize that any innovation in AI must be done responsibly. This becomes even more important with powerful, new technologies like generative models. We have taken an iterative approach to large models, working closely with our partner OpenAI and our customers to carefully assess use cases, learn, and address potential risks. Additionally, we’ve implemented our own guardrails for Azure OpenAI Service that align with our Responsible AI principles. As part of our Limited Access Framework, developers are required to apply for access, describing their intended use case or application before they are given access to the service. Content filters uniquely designed to catch abusive, hateful, and offensive content constantly monitor the input provided to the service as well as the generated content. In the event of a confirmed policy violation, we may ask the developer to take immediate action to prevent further abuse.
We are confident in the quality of the AI models we are using and offering customers today, and we strongly believe they will empower businesses and people to innovate in entirely new and exciting ways.
The pace of innovation in the AI community is moving at lightning speed. We’re tremendously excited to be at the forefront of these advancements with our customers, and look forward to helping more people benefit from them in 2023 and beyond.
Getting started with Azure OpenAI Service
- Learn more about Azure OpenAI Service and more about all the latest enhancements.
- Apply for access to Azure OpenAI Service. Once approved for use, customers can log in to the Azure portal to create an Azure OpenAI Service resource and then get started either in our Studio website or via code:
- Read the blog: AI and the need for purpose-built cloud infrastructure.
- Watch a video with tips on how to get started with Azure OpenAI Service:
Delta Lake is open source software that extends Parquet data files with a file-based transaction log for ACID transactions and scalable metadata handling. Now, Stream Analytics no-code editor provides you an easiest way (drag and drop experience) to capture your Event Hubs data into ADLS Gen2 with this Delta Lake format without a piece of code. A pre-defined canvas template has been prepared for you to further speed up your data capturing with such format.
To access this capability, simply go to your Event Hubs in Azure portal -> Features -> Process data or Capture.

Source: Public preview: Capture Event Hubs data with Stream Analytics no-code editor in Delta Lake format
Azure Data Explorer (ADX) now supports managed ingestion from Azure Cosmos DB.
This feature enables near real-time analytics on Cosmos DB data in a managed setting (ADX data connection). Since ADX supports Power BI direct query, it enables near real-time Power BI reporting. The latency between Cosmos DB and ADX can be as low as sub-seconds (using streaming ingestion).
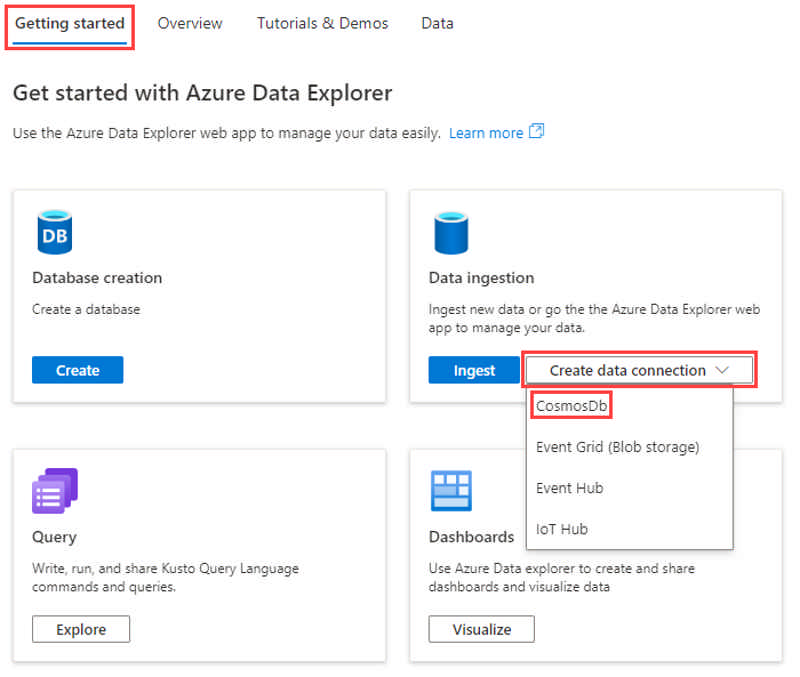
This brings the best of both worlds: fast/low latency transactional workload with Azure Cosmos DB and fast / ad hoc analytical with Azure Data Explorer.
Only Azure Cosmos DB NoSQL is supported.
Source: Public Preview: Azure Cosmos DB to Azure Data Explorer Synapse Link
Azure Database for PostgreSQL – Flexible Server uses storage encryption of data at-rest for data using service managed encryption keys in limited Azure regions. Data, including backups, are encrypted on disk and this encryption is always on and can't be disabled. The encryption uses FIPS 140-2 validated cryptographic module and an AES 256-bit cipher for the Azure storage encryption. Currently this feature is available in the Switzerland North, Switzerland West, Canada East, Canada Central, Southeast Asia, Asia East and Brazil South regions.

Infrastructure encryption with customer managed keys (CMK) adds a second layer of protection by encrypting service-managed keys with customer managed keys. It uses FIPS 140-2 validated cryptographic module, but with a different encryption algorithm. This provides an additional layer of protection for your data at rest. The key managed by the customer that is used to encrypt the service supplied key is stored in Azure Key Vault service, providing additional security, high availability, and disaster recovery features.
Source: General availability: Encryption using CMK for Azure Database for PostgreSQL – Flexible Server
The new Azure Cosmos DB connector V2 for Power BI now allows you to import data into your dashboards using the DirectQuery mode, in addition to the previously available Import mode.
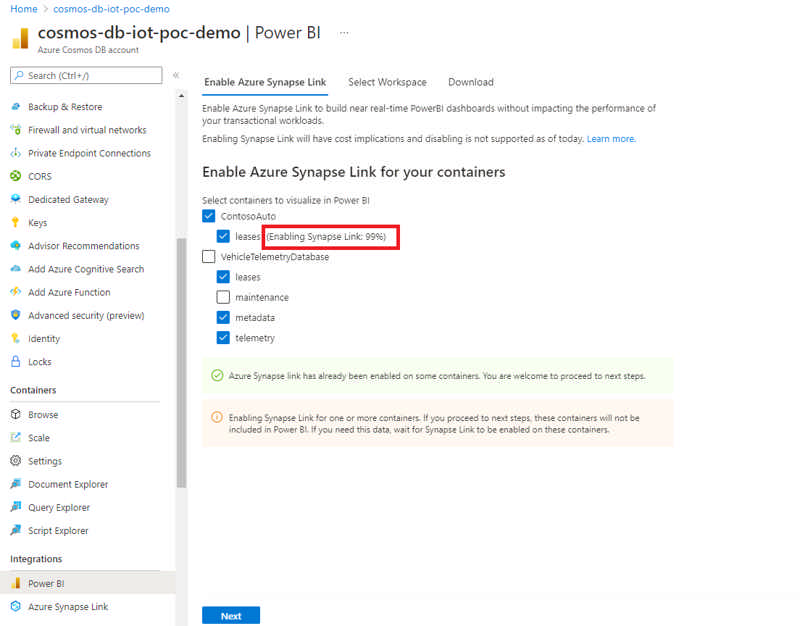
The DirectQuery mode in the V2 connector is helpful in scenarios where Azure Cosmos DB container data volume is large enough to be imported into Power BI cache via Import mode. It’s also helpful in scenarios where real-time reporting with the latest ingested data is a requirement. This feature can help you reduce data movement between Azure Cosmos DB and Power BI, with filtering and aggregations being pushed down. It is also helpful in user scenarios where real-time reporting with the latest ingested data is a requirement. Direct Query also has performance optimizations related to query pushdown and data serialization.
Source: Public preview: Azure Cosmos DB V2 Connector for Power BI
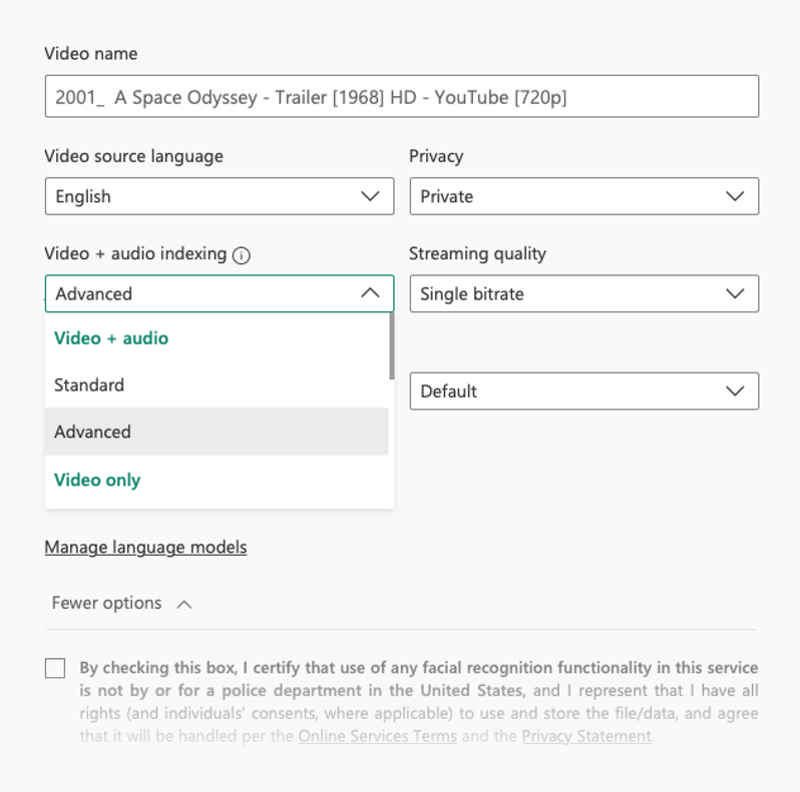
With the "Featured Clothing" insight, you are able to identify key items worn by individuals within videos. This allows high-quality in-video contextual advertising by matching relevant clothing ads with the specific time within the video in which they are viewed. "Featured Clothing" is now available to you using Azure Video Indexer advanced preset. With the new featured clothing insight information, you can enable more targeted ads placement.
Materialized view provides the ability to create Apache Cassandra tables with different primary/partition keys. This reduces write latency for your source table since the service handles populating the materialized views automatically and asynchronously. Benefit from low latency point reads directly from the views and overall greater compatibility with native Apache Cassandra.
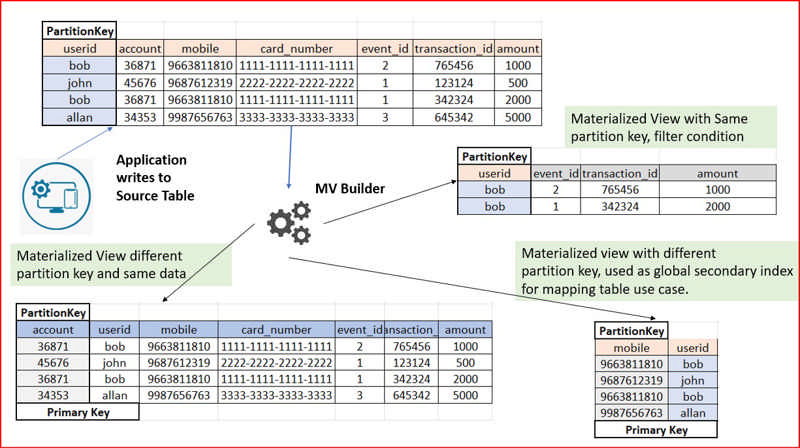
Source: Public Preview: Materialized view for Azure Cosmos DB for Apache Cassandra
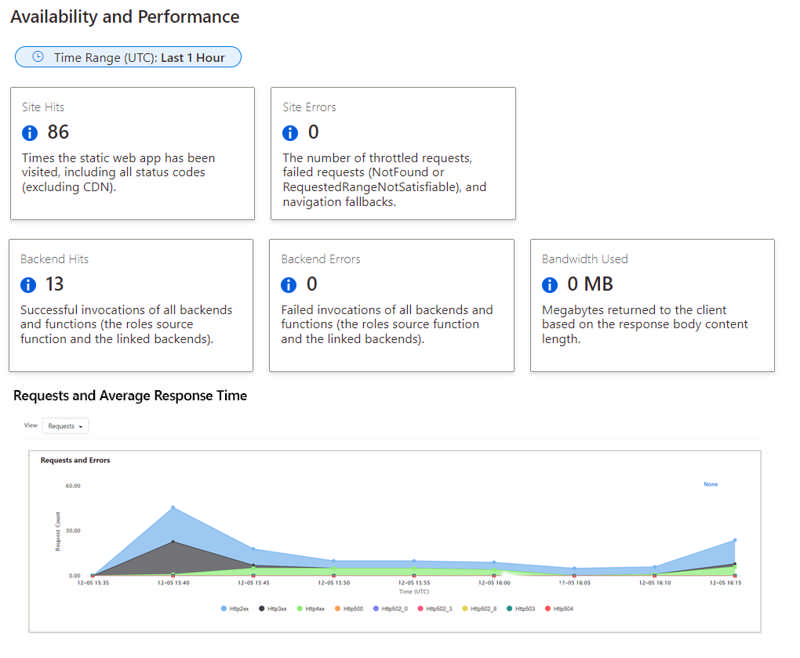
Generally available: Static Web Apps Diagnostics
Azure Static Web Apps Diagnostics is an intelligent tool to help you troubleshoot your static web app directly from the Azure Portal. When issues arise, Static Web Apps diagnostics will help you diagnose what went wrong and will show you how to resolve the issues. This guidance helps you improve the reliability of your site and track its performance.
File storage is a critical part of any organization’s on-premises IT infrastructure. As organizations migrate more of their applications and user shares to the cloud, they often face challenges in migrating the associated file data. Having the right tools and services is essential to successful migrations.
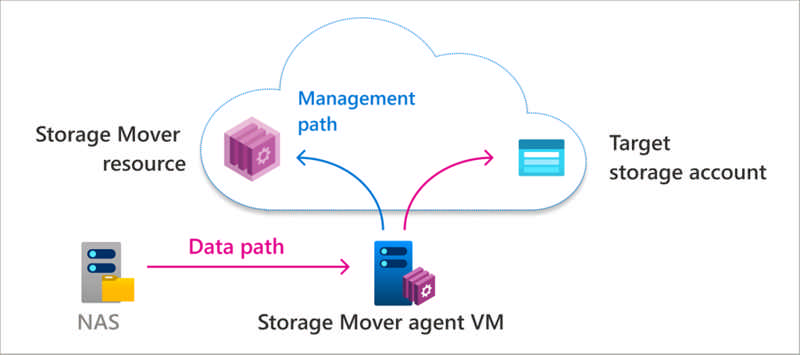
Across workloads, there can be a wide range of file sizes, counts, types, and access patterns. In addition to supporting a variety of file data, migration services must minimize downtime, especially on mission-critical file shares.
Source: Azure Storage Mover–A managed migration service for Azure Storage
We’re announcing that Azure Virtual Desktop has public preview support for Azure Confidential Virtual Machines. Confidential Virtual Machines increase data privacy and security by protecting data in use. The Azure DCasv5 and ECasv5 confidential VM series provide a hardware-based Trusted Execution Environment (TEE) that features AMD SEV-SNP security capabilities, which harden guest protections to deny the hypervisor and other host management code access to VM memory and state, and that is designed to protect against operator access and encrypts data in use.
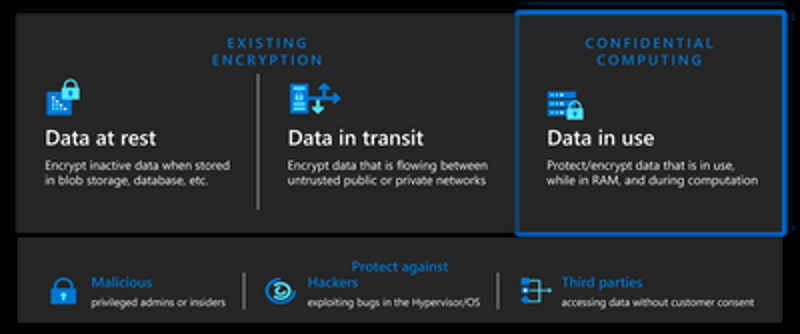
With this preview, support for Windows 11 22H2 has been added to Confidential Virtual Machines. Confidential OS Disk encryption and Integrity monitoring will be added to the preview at a later date. Confidential VM support for Windows 10 is planned.
Read more at Azure Daily 2022
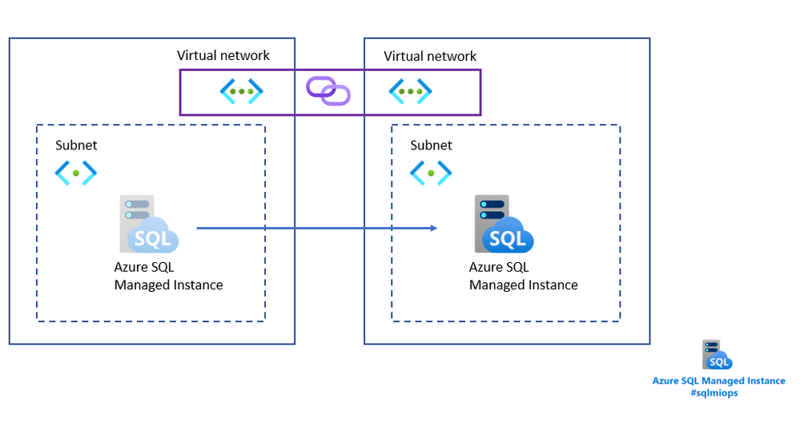
In this blog, we will present a feature for moving Azure SQL Managed Instance from one to another subnet located in a different virtual network. This capability comes as an enhancement of the existing capability for moving the instance to another subnet.
Read more at Azure Daily 2022
Microsoft is excited to announce the public preview of one of our most requested native monitoring features – Azure Virtual Desktop Insights at Scale. This update provides the ability to review performance and diagnostic information across multiple host pools in one view.
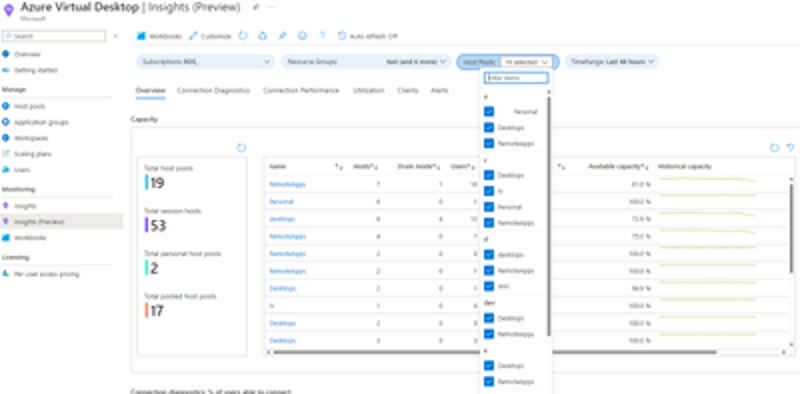
Previously, Azure Virtual Desktop Insights only supported the ability to review information related to a single host pool at a time. In many cases this limited visibility into issues that may have an impact across multiple host pools.
Read more at Azure Daily 2022
Enable higher throughput levels for Azure Service Bus premium via two new features in public preview today.
First, we are releasing scaling partitions, allowing the use of partitioning for the premium messaging tier. Service Bus partitions enable messaging entities to be partitioned across multiple message brokers. This means that the overall throughput of a partitioned entity is no longer limited by the performance of a single message broker. Additionally, a temporary outage of a message broker, for example during an upgrade, does not render a partitioned queue or topic unavailable, as messages will be retried on a different partition.
Second, we are making a change to our infrastructure, which will result in more consistent low latency. This is accomplished by switching our storage to a different implementation called local store. During public preview we will create partitioned namespaces using this new feature, but in the future all new namespaces will be created on local store.
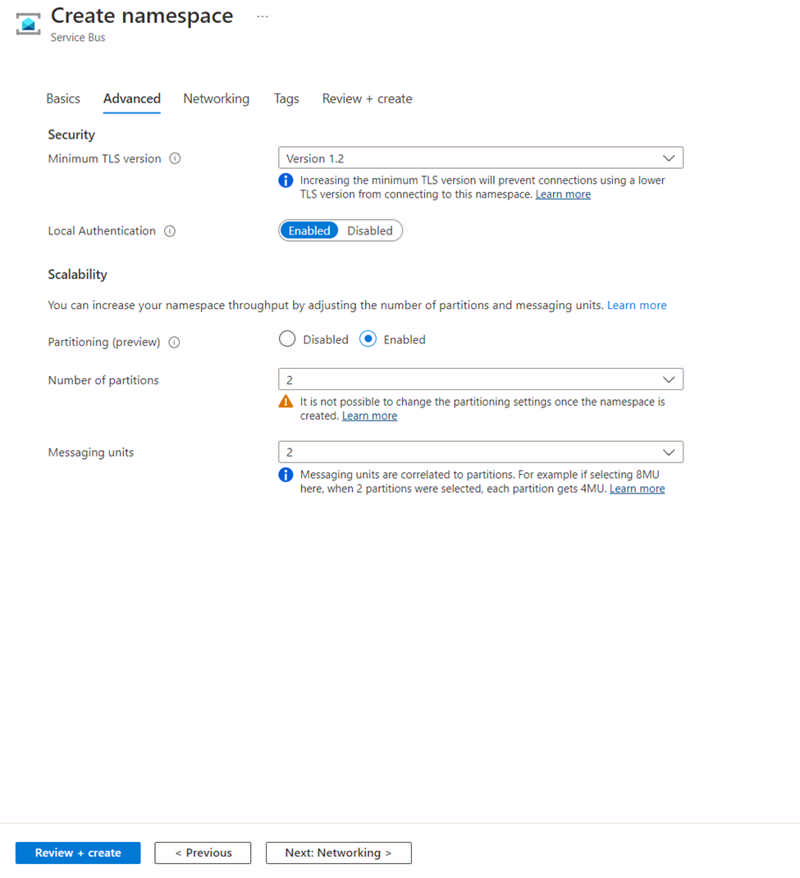
Source: Public preview: Performance improving features for Azure Service Bus premium
Log compaction is a way of retaining events in Event Hubs. Rather using time based retention, you can use key-based retention mechanism where Event Hubs retrains the last known value for each event key of an event hub or Kafka topic. Event Hubs service runs a compaction job internally and purges old events in a compacted event hub. The partition key that you set with each event is used as the compaction key and users can also mark events that needs to be deleted from the event log by publishing event with a key and null payload.
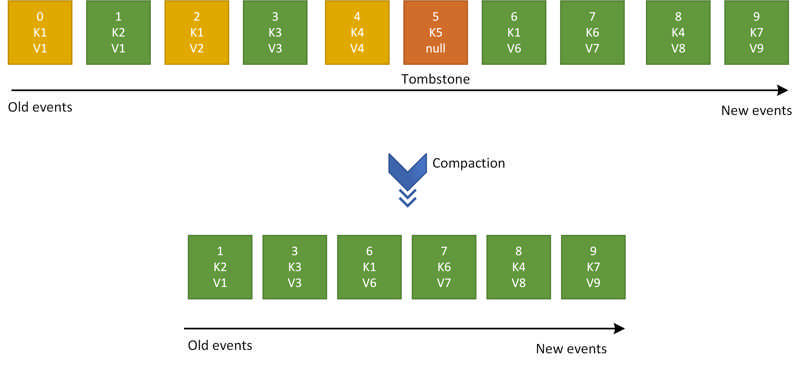
To learn more about log compaction, please check out Log Compaction documentation.
Source: Public preview: Log compaction support in Azure Event Hubs
Inside each streaming node of an Azure Stream Analytics job, there are Stream Analytics processors available for processing the stream data. Each processor represents one or more steps in your query. The processor diagram in physical job diagram visualizes the processor topology inside the specific streaming node of your job. It helps you to identify if there is any bottleneck and where the bottleneck is in the streaming node of your job.

Source: Public preview: Processor diagram in Physical Job Diagram for Stream Analytics job troubleshooting
Service Tiers
- vCore-based purchasing model
- General Purpose (Scalable compute and storage options)
- Hyperscale (On-demand scalable storage)
- Business Critical (High transaction rate and high resiliency)
- DTU-based purchasing model
- Basic (for less demanding workloads)
- Standard (for workloads with typical performance requirements)
- Premium (for IO-intensive workloads)
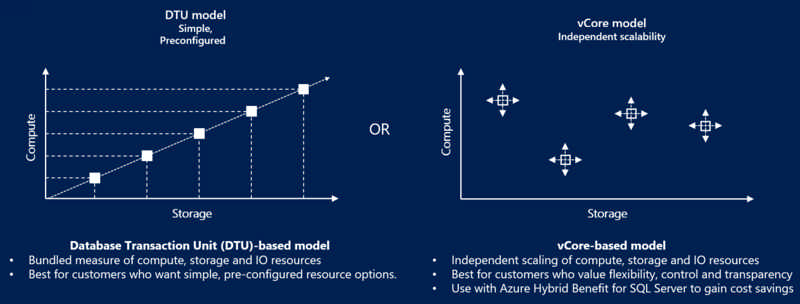
Compute Tiers (for General Purpose vCore)
- Provisioned - Compute resources are pre-allocated. Billed per hour based on vCores configured
- Serverless - Compute resources are auto-scaled. Billed per second based on vCore used
Additional Resources
- .NET
- Agile
- AI
- ASP.NET Core
- Azure
- C#
- Cloud Computing
- CSS
- EF Core
- HTML
- JavaScript
- Microsoft Entra
- PowerShell
- Quotes
- React
- Security
- Software Development
- SQL
- Technology
- Testing
- Visual Studio
- Windows